Blog Entry 1: Laser Cutting
- yuhan21
- Nov 4, 2022
- 3 min read
Updated: Nov 5, 2022
Hello everyone! Welcome to my first blog entry for CP5070 Chemical Product Design & Development! In this blog entry, I will be sharing about my experience in getting prepared and completing my Laser Cutter Certification Test! The test was held at Singapore Polytechnic's Main Library; MAKERSPACE.
What is Laser Cutting?
Laser cutters create patterns and designs by cutting into materials. A powerful laser beam is the source that melts, burns, or vaporizes the material.
Essentially, laser cutting is a fabrication process that uses a thin, focused, laser beam to cut and etch materials into custom designs, patterns, and shapes as specified by a designer. This non-contact, thermal-based fabrication process is ideal for several materials, including wood, glass, paper, metal, plastic, and gemstone. It’s also capable of producing intricate parts without needing a custom-designed tool.
'Laser' has become such a common word that people have forgotten its original meaning, which is: Laser Amplification by Stimulated Emission of Radiation.
Before operating the laser cutter, it is important to take note of what materials are suitable for use. The table below shows the approved and prohibited materials for the laser cutter.

Vector and Raster
In our tutorial classes, we learnt about Vector and Raster.
Vector
Resolution: Scalable
File size: Small
File format: EPS, SVG, AI
Vector graphics are also known as scalable vector graphics (SVG). These graphics consist of anchored dots and connected by lines and curves, similar to the connect-the-dot activities you may have done as a kid.
Raster
Resolution: Pixel
File size: Large
File format: BMP, GIF, JPG, PNG, TIFF
Raster images are made of pixels, or tiny dots that use colour and tone to produce the image. Pixels appear like little squares on graph paper when the image is zoomed in or enlarged. These images are created by digital cameras, by scanning images into a computer or with raster-based software
Hence, for laser cutting, there are three different ways of cutting, as explained below:
Vector cutting
The laser follows the outline of an object and cuts it out.
Vector engraving (scoring)
The laser beam will follow the path of vector strokes without cutting all the way through. Also called etching.
Raster engraving
The laser moves back and forth, top to bottom to engrave an image. It will precisely burn away the top surface of the material.
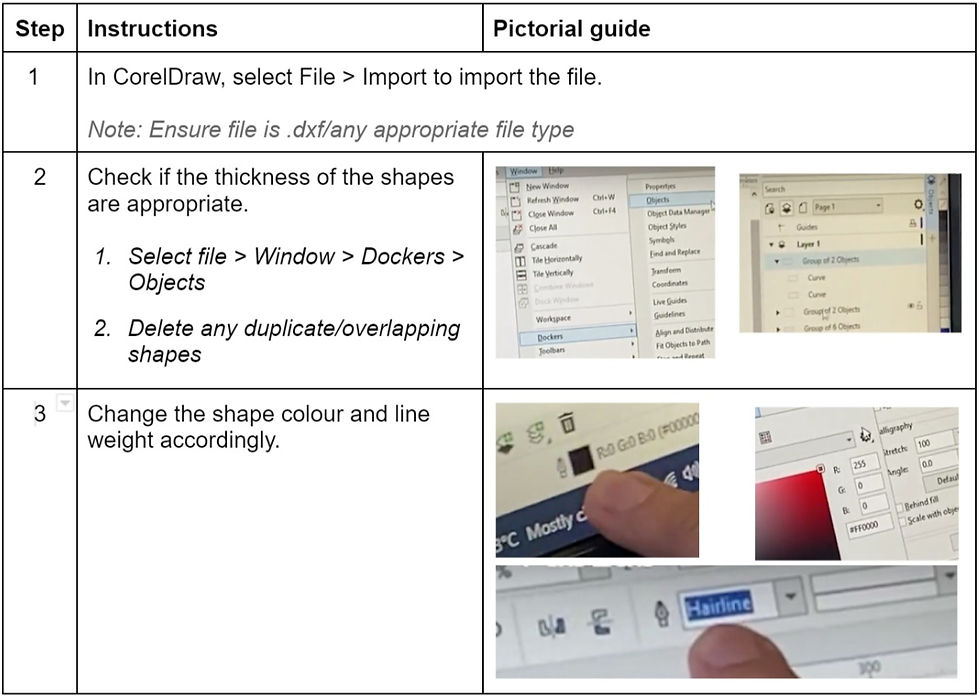
The quick guide below shows the settings required in CorelDraw in order to create the different cutting methods.

Prior to the test, we were tasked to create our own set of Standard Operating Procedures (SOP) by referring to the learning materials provided on E-Learning Portal Brightspace.
Before operating the laser cutter, it is mandatory for us to be aware of the risks and hazards. The table below shows 5 important hazards associated with the process of laser cutting machines and their respective safety control measures.

With all the information on laser cutting and understanding the risks and hazards involved, we can now move on to the procedures involved in laser cutting at MAKERSPACE, using the UNIVERSAL laser cutter.
a. Starting the compressor, turning on the laser cutting machine and fume extractor.

b. Importing a .DXF file to CorelDraw and modify the lines/fill for cutting and engraving.

c. Sending the CorelDraw drawing to laser cutter software and setting the laser cutter power, speed, PPI in the software.

d. Starting the job on the laser cutter machine.

e. DOs and DONTs when there’s flame/fire on the material being cut.

Learning Reflection
The laser cutter certification test was... an experience. We were tasked to create a set of SOP for the laser cutter out of the blue, with only a set of online learning materials and videos provided to us on Brightspace. Due to this, we were all stressed out and some of us had even created SOPs of 13 pages when the recommended pages were 3. Personally, after much troubleshooting, I managed to decrease my page count from 8 to 4.
Turns out, the laser cutter certification test was not as challenging that everyone had thought it to be. I was instructed to laser cut a piece of red acrylic into a cat emoji. Through the completion of the test, I had realised that my SOP for the laser cutting operation process could actually be cut down from 18 steps to 11 steps! Though some may regret overpreparing, I believe that it doing so actually worked in our favour as everyone was rather clear on what to do.
Despite the laser cutter certification test being a thorn at my side for a few days as I was stressed out that I may not do well for the test or that my SOP was not good enough, I am really glad that I managed to pick up the skills and knowledge regarding laser cutting so that I would be more well-prepared for my incoming product fabrication process.
Thank you for reading my blog, and stay tuned for my next blog entry regarding gears!


YoU fOrGoT pIcTuReS oF tHe MaTeRiAlS iN yOuR bloG